Category: Frugal Living

Ideas and everyday things to live below your means or save money

  • Rendering Tallow

    Beef tallow – I see it everywhere these days. It’s getting the bad rap removed and the benefits are coming back to the forefront. Our ancestors used this for so many purposes, and I decided to give it a try.

    Hubby & I recently bought some sirloin and ground beef at CostCo. As the hubby was cutting the sirloin into steaks, he was cutting off quite a bit of fat and throwing it away. I stopped him and told him to save the rest and put it in a bowl. I would render the tallow.

    I then was going to cook up the 5.5 lbs of ground beef and freeze it and decided to use the fat from that as well. (Of course, I poured off the fat before I did any seasoning of the meat)

    (Aside – I cooked up about 3 lbs as taco meat and portioned out into vacuum sealed bags to freeze. And cooked up the remaining and kept it plain to be able to throw into other things that call for ground beef)

    I put it all into a crockpot and let it go on low all day. It didn’t liquify quite as I expected it to, but there was still a lot in there.

    At the end of the first day, I strained it into a bowl and refrigerated overnight.

    The next day, I took the bowl out of the fridge and turned it over onto a cutting board to be able to scrap off the stuff that would have gone to the bottom of the bowl.

    Well, that didn’t go quite as planned. I wasn’t expecting so much gelatin in the bowl, so the fat layer came off the top and gelatin went all over the counter.

    Once I got that cleaned up, I scrapped off the non-fat bits from the bottom of the fat layer and put it back into the crockpot to go for another rendering.

    When I took it out of the fridge, there were small yellow circles randomly across the top of the fat. (You can see some in the picture above) And I knew there would be beef bits hanging out below where I could see in the bowl.

    I’m expecting it will take 3 renderings to get it to the pure white I’m expecting. (But, given that this is likely not grass-fed, grass-finished really cleanly raised beef, there’s a good chance it won’t come out as pure white as I hope it does. Time will tell.)

    (I’m writing this post as I go, so at this point, I don’t know the ending!)

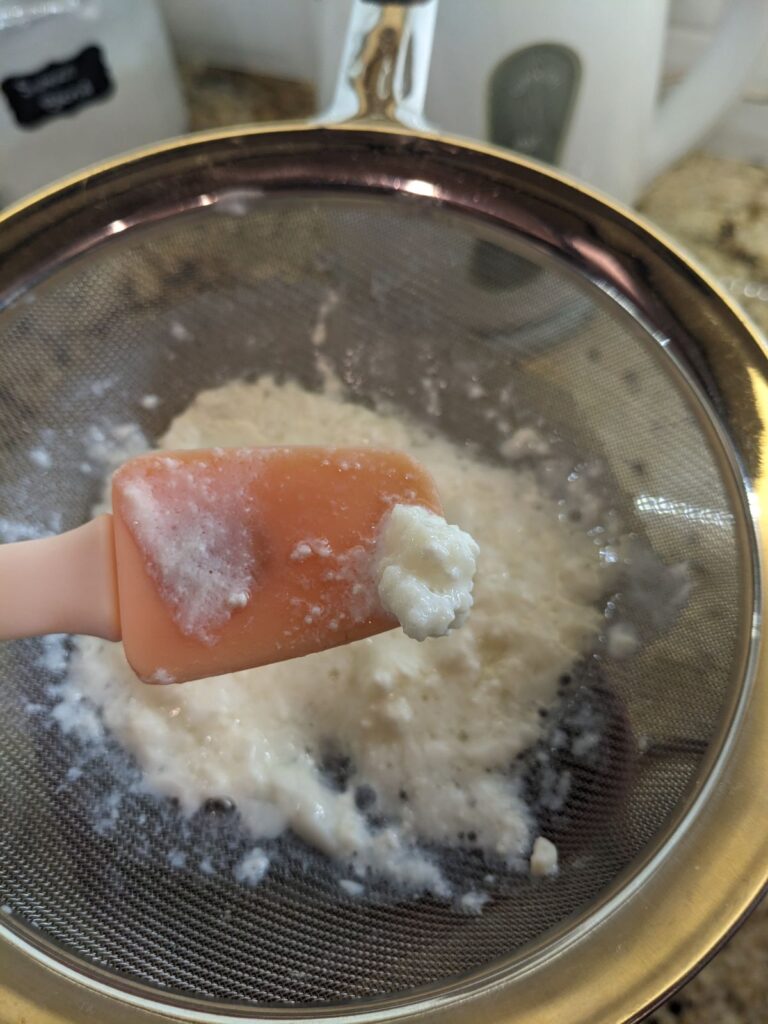
    Day 3 rendering has been done. The tallow still had a beef smell to it but looked right. I did a bit of digging on Pinterest and it turns out to “purify” it, I needed to melt it down with some salt & water.

    After doing that, I poured through a fine strainer into the bowl again and could see a bit of impurities at the bottom as well as water droplets.

    Once it cooled in the fridge and I pulled out the fat, the water and impurities stayed at the bottom of the bowl, and I was able to melt once more to pour into the mold I wanted for keeping it until I use it.

    Since I purified it, I will be able to use this for cooking or making soap or other beauty products. I’ve been wanting to make soap and will likely use at least some of this tallow for that.

    It’ll be fun to use it. There’s something satisfying about making things from other things and not having as much waste or having to go to the store.

  • Fall 2025

    November has started in the PNW in the typical dark and rainy fashion. But that just means, indoor projects and hobbies!

    I have continued to work on getting the free fruit processed. The Liberty apples are applesauce, canned and stored on a shelf in the garage.

    Garage shelf with applesauce as well as freeze dried meats and broth. And cool storage for onions & potatoes

    The cider apples are pending processing. Once I finished that box, I’m done with this batch of fruit. These will get sliced and either freeze-dried or frozen.

    The pears were diced and freeze-dried. And also turned into vanilla pear butter. I have it in the fridge and need to water bath can it so it will store well.

    The hubby & I cleared out the den closet and rearranged and added a couple of new shelves. It’s not finished yet, but so far it has drastically helped the storage ability of that closet! I look forward to filling it with more goodies.

    New shelves in den closet with a lot more room to expand! I have it sorted by fruits, vegetables and ready-to-eat meals. Broths are in the kitchen cupboards and in the garage. And meats are in the garage.

    One great thing about cleaning out that closet was getting all of the freeze-dried food organized. We have quite a bit of fruit and vegetables.

    I was able to see how many pre-made meals we have available. I’ll need to work on getting more ready for next summer’s backpacking adventures!

    If you’ve ever thought about getting a freeze-dryer yourself, Harvest Right is running their Black Friday sale *during the month of November. Check it out! All freezer-dryers are discounted this month!

    old-style Small Harvest Right freeze-dryer.

    One project I’ll be working on after finding some old seat covers from the RV is to repurpose those to make a cover for the freeze-dryer. Since I have it in the garage, we always have to remember to throw a tarp or a towel over it when my husband is doing anything in the garage that will make a lot of dust.

    The jam shelf is also filling up this fall. We don’t eat a ton of jam so I’m finding that if I make small batches every other year, that gives us plenty.

    Apple butter, quince jam, ‘raspbarb’ (raspberry/rhubarb) jam and tayberry jam

    One thing I plan on doing each spring is to turn any leftover frozen berries into jam. Once the berries start coming in, I need room in the freezer for the fresh ones so will clear out the previous seasons.

    I hope your autumn is going well and you’re looking forward to Thanksgiving! I’m grateful that you’re reading my blog! Thanks!!

    (*this is an affiliate link which means I’ll make a % of any sales that result from you clicking through my link)

  • Reusable Paper Towels

    *Updated 1/9/2025 – scroll to the end for the update

    In previous posts, I’ve mentioned that I am looking for ways to avoid the stores (thus saving money). I was at a garden show earlier in 2024 and one of the vendors was selling reusable paper towels. The vendor’s stuff was cute, but she didn’t have the color scheme I was looking for.

    I looked over the product she was selling and thought “this is easy enough that I can make it myself.” It was flannel cut into 10×10 squares and the edges were ‘hemmed’.

    I went to the fabric store and purchased a yard each of flannel that was more to the colors/patterns that suited me.

    I received a new sewing machine for Christmas and was thrilled that it has the stitching ability to do the ‘hemming’ that I wanted to do. (It’s an overlock stitch)

    Like all projects, I procrastinated in getting started, but mostly that was due to waiting for the new sewing machine.

    I started by washing the material, so any shrinking was done before cutting and stitching. I then cut the material into 10″ by 10″ squares. (The material was folded so I was cutting more than 1 square at once)

    I then starting using the overlock stitch on my machine to finish them up. Sewing squares isn’t all that exciting. LOL

    Once I got all four sides done, I snipped any threads, and cut off the rounded corners with a good paid or scissors.

    I was careful around the corners to not cut the overlock stitch. I do expect a bit of fraying on those corners when I wash it. But, it’ll do that until the material falls off to the stitch and then it should stop.

    To roll them up like paper towels, I rolled one, then overlapped it with the next and kept rolling. It turns out 5 yards of material end up making about 3 rolls of ‘paper towels’. (I have scrap material left, but none that was large enough for paper towel size.)

    But they are finished and I love how they turned out!

    One less thing to have to buy at the store!

    Update: 1/9/2025 – My husband and I took a vacation on the other side of the mountains and the town has an adorable little store that we love to stop in at. Low and behold, they had some reuseable paper towels – 12 for $36.95!!!! :O This was definitely a cost savings.

    These are just like I made, but plain. I spent about $25 for 5 yards of material and used a spool of thread I already had at home. I ended up with about 55 ‘paper towels’. Holy cost savings Batman!!!!

  • Freeze Drying – 2024 Black Friday Sale!

    *this post has affiliate links which means that if you make a purchase through the links below, I will make a small commission

    If you’ve read my blog in the past, you know that I love freeze drying!! Here are some past posts where I’ve talked about it:

    Reducing Food Waste
    Strawberries

    I originally bought the machine so I could control the ingredients in the food we eat when we’re out backpacking. I stay away from sugar and preservatives and the pre-made meals we would buy were expensive.

    Freeze drying has allowed us to have homecooked meals out in the middle of nowhere. And the food is VERY lightweight to carry in backpacks!

    In late 2022, we bought a small Harvest Right home freeze dryer. Leftovers are now eaten in the backcountry instead of going in the freezer or the garbage because we forgot to eat them.

    I will often cook a meal with the intent of freeze-drying half for future meals. Often, I have leftover ingredients from meals I made and veggies are about to go bad. I freeze-dry those to use later. (Right now, I have celery, carrots and onions in the machine which is amazing to have on hand to throw into a soup in winter.)

    If you’ve ever thought about getting one, now is the time to check it out! Harvest Right is running their Black Friday sale through the month of November.

    A medium home PRO dryer is now the price I paid for a small 2 years ago!!!

    When I was first looking at them, I did the math to see how much this could save us. When we backpack, we would take breakfasts and dinners that we bought. Breakfasts averaged $9-$13 each and dinners averaged $15-$20 each. With two of us, that adds up quickly and the store-bought food isn’t that good. The price of the machine divided by the daily cost (mind, this did NOT include lunches as we usually would eat bars or snacks instead of a meal), it would take 80 total nights to pay for itself (40 nights if we were both going)

    That first summer after buying the machine, we were out 35 nights total between the two of us (Hubby had 2 backpacking trips I didn’t go on), but I also had a pantry full of food, ingredients, and snacks ready to go if/when I wanted anything.

    Our machine has paid for itself in two years. And we are still going strong on freeze drying and backpacking! My husband, who was skeptical at first, has shared his praises with friends about how great the food is and how much he’s glad we got this.

    If you’re in the market, take advantage of the great prices going on now!

    Harvest Right

  • A Day in the Life – Probiotics

    *a few of the links in this post are affiliate links. That means if you click and order something, I’ll make a few pennies.

    What does a day in my life look like? Most days are pretty similar. Some days I have more energy than others or get more ambitious than on other days.

    Rather than lay out a whole day of what I’ve done on a particular day, I’ll instead give a glimpse into random activities I do.

    In my ‘homestead wife ness’, I’m still making kombucha and kefir regularly. I have made fermented vegetables. I’ve pickled red onion and radish seed pods. And I’ve made sourdough.

    Kefir is a daily or every other day task, but is quite simple.

    What is kefir you ask? It’s fermented milk. Before you wonder what has gotten into me and why I would drink bad milk, let me tell you! It’s NOT bad milk, its fermented. I have ‘grains’ that I put into milk, let it sit (unrefrigerated) for about 24 hours (sometimes longer if I forget about it) and then I strain the kefir into a new jar and put the ‘grains’ back into the original jar and add more milk to start the process over again. (‘Grains’ look like tapioca beads)

    Kefir “Grains”

    The grains will ‘eat’ the lactose in the milk leaving behind really good-for-you bacteria that is amazing for your gut! I’ve read that people who can’t do dairy CAN do Kefir because once the bacteria have done their thing, the part that constitutes a ‘dairy product’ has been eaten and it no longer there to cause issues.

    It tastes like drinkable yogurt. I like drinking it cold which is why I refrigerate the strained kefir. I add a splash of vanilla and a 1/36th tsp (doonk) of pure stevia powder – drinkable vanilla yogurt.

    Looking for a really good, cheap probiotic? KEFIR – find some grains and use store bought (NOT ultra-pasteurized) milk.

    Kombucha is also an ongoing adventure. What is kombucha, you ask? It’s fermented tea! (sensing a theme, maybe?) You can start from scratch, but I’ve always either bought or gotten a SCOBY (Symbiotic Culture of Bacteria & Yeast) to get things started. I brew 2 cups of tea with 1 cup of sugar (basically make a sweet tea), then after it cools to room temp, I add that to the SCOBY and about a cup of tea from the last batch and then add enough water to have a gallon of tea.

    Kombucha brewing in the closet (the big slimy thing floating is the SCOBY – it’s eating the sugar)

    That tea then sits in a dark closet for at least 2 weeks (usually longer) while the SCOBY eats the sugar. After about 2 weeks, I taste it to see if its ready. I don’t have an exact science for it, but I can tell by taste when it gets to where I want it. When it’s ready to bottle, it has a slight effervescence (light a light champagne) with just a hint of sweetness. If it has a vinegar taste, I’ve let it go too long, but I actually still like it a bit tart, so it doesn’t go to waste. I have yet to try much with second fermenting to get flavors added, but that is the next step.

    Liquid gold – Kombucha ready to drink!!

    Again, looking for a cheap, healthy probiotic – KOMBUCHA! It’s the cost of 2 Tbsp of loose tea and a cup of sugar.

    For the fermented vegetables, I used a recipe I received for signing up for a THM coach website (A Joyful Life with KJ). I’ll admit these took several times of eating to actually enjoy them. But I really DO like them! They’re a big mix of vegetables that I put in half gallon mason jars and use fermenting lids* with weights to ferment for a couple of weeks before they were ready.

    Fermented vegetables (1 jar was 1/2 the batch)

    Again, really good for you, yummy healthy probiotic – FERMENTED VEGETABLES!!!

    Did you sense a theme here? The more I learn about health and my own personal health, the more I hear about the importance of a healthy gut. Good, fermented foods are essential to help introduce good bacteria to your body. The standard American diet with ultra-processed foods has us lacking good bacteria and teeming with bad bacteria which causes all kinds of havoc. If you have some gut issues (or even some you wouldn’t associate with your gut), give some good, fermented food a try and see what that does for your health!

    If you want to learn more, take a look at Donna Schwenk’s books:
    Cultured Food for Life*
    Cultured Food in a Jar* (or via Kindle*)

  • Radish Seed Pod Pickles

    umm…what in the world??? Radish Seed Pod Pickles?

    Radish Seed Pods

    In looking at Pinterest or some other gardening something in the cyber world, I came across the fact that radishes go to seed in pods. And those pods are edible.

    In the spring, I was frustrated with my garden not producing well and knew it was likely due to old seeds, so in an attempt to not be wasteful, I threw those old seed packets onto the garden in hopes that they MIGHT grow into something!

    I had one packet that did grow, but not enough for me to tell what it was. It got really leggy and went to flower pretty quickly.

    Radish Flowers (edible)

    The other day, I noticed that it was developing seed pods and realized it had been radish seeds. NO radishes grew though, just the greens (and very puny greens at that).

    Once I realized what it was, I went to Pinterest to see what kind of recipes there are for these.

    Most of what I found are for seed pod pickles. So yesterday, I harvested pods and made a half of a batch of radish seed pods pickles. From what I’ve read, everything in this plant will have the bit of spice that a radish does.

    Radish Seed Pod Pickles (edible? I’ll see tomorrow!!)

    I’ll let them sit in the brine for a couple of days to really get good and pickled and then I’ll try them.

    Some of the pods will also be left in the garden to dry up and I’ll harvest those to use to seed new radishes next year.

    Apparently, the entire radish plant is edible. I think I’ll stick to the bulbs and if these pods turn out tasty, I’ll eat those too. The flowers, stems and roots can stay where they are.

  • Apple Cider Vinegar

    *This post contains affiliate links which means if you click on them and buy something, I’ll earn a commission.

    Apple season is coming! We have 3 apple trees in the back yard and one of them is dropping apples to the ground. I think they have a bit of help in falling as several of the apples are half eaten. (Squirrels :P)

    I don’t like to waste if I can help it, and apples on the ground are still useable!

    Not so pretty apples!

    Aside from any bugs, you use the whole apple to make apple cider vinegar. I was browsing Pinterest last year when I found a recipe that looked easy enough. I have everything I need on hand! I have apples, water, sugar, glass jars and time.

    Almost 5 lbs of apples have been picked up from the ground but none looked appetizing. And some aren’t ripe.

    This afternoon, I pulled the frozen apple scraps I’ve been saving and then used the ones from the ground and fill up 2 half gallon mason jars.

    Frozen Apple scraps

    After cutting up the apples (they fit better and it cuts out the bugs), I measured out about 3 cups of water to fill up each of the jars, added 1 TBSP of sugar per cup of water (so 3 TBSP per jar), put a lid on to give it a good shake. I then took off the lid and used a coffee filter with a ring to let it ferment for the next two weeks.

    You can add a splash of apple cider vinegar to help the fermentation process along. I decided to do that this time and added probably a TBSP to each jar (I didn’t measure).

    Now it’s time for TIME to do its job. I will stir these jars daily for the next two weeks and wait for it to stop bubbling. Once that has settled down, I’ll strain out the apples and bottle up the liquid which will still sit in the bottles for a few months before its ready to use.

    How’s that for almost free vinegar that is probably $6/pint at the store??? I love finding ways to use up scraps in a way that is something I already use!

  • Garden Update – July 2024

    *This post contains affiliate links

    July is THE month for most of what we have in our backyard! All of the berries are ripening and with the heat starting, most of the rest of the garden is growing!

    We’ll start with fruit trees. We have three apple trees, a mulberry tree (technically a berry, I guess) and a quince tree.

    One apple tree decided to not blossom after a pretty significant pruning. Hopefully it’ll come back full force next year. Another apple tree is growing a ton of apples….on ONE side of the tree! The third apple tree is a columnar that has a bunch of apples on it.

    And finally we have one quince on our quince tree. It was planted last year, so the fact that it has ANY fruit coming in is amazing!

    Next up, the berries. See my previous post about our berry varieties and my Bubba Gump issue when I start in talking about our berries.

    The black currants came in seemingly early this year compared to last year. I don’t know what to do with these (please share any ideas!) so I tend to forget to harvest them. The blackberries and boysenberries are starting to ripen. I’ll need to wear gloves for the blackberries. Those thorns are no joke!

    The blueberries are ripening well! I’ve had two days already that I’ve been able to pick over a pound each day.

    The Tayberries are starting to wrap up. I think there is probably another week of those. (For those not familiar with what a Tayberry is, think a really large, dark red blackberry).

    The alpine strawberries are doing really well. But the berries are so tiny, when I put them on my scale (I track everything I harvest), they don’t weigh enough to register. And finally, the spring raspberries are finishing up. We’ll get another harvest of those in fall – thank you everbearing raspberries!

    The garden is doing alright. The potatoes look like they’re growing perfectly! I hope they are doing as well underground as they look like they are above ground. I have Huckleberry Gold potatoes in the garden and in a pot. The sweet potato plant (Manihi Treasure Island) has taken off. I guess it likes the heat!

    And we have two types of tubers – Oca and Mashua

    The garden looks better than it did, but I will admit, I don’t have high expectations for it. The potatoes, yes, they’ll do fine. But the rest, it’s a good thing we’re close to grocery stores!

    The asparagus popped up 2 more stalks for a total of 8 this year. They all get to go to seed! The beets are still at it, but I’m not seeing any sign of actual bulb growth! There is a bit of some sort of lettuce growing in one spot, so at least one old seed germinated!

    I have several tomatoes planted throughout, but none are growing all that quickly. I’m beginning to wonder if they’ll have enough time to bloom and actually grow any fruit.

    The two pepper plants are similar to the tomatoes. They’re growing ever so slowly, but I’m thinking they’re going to run out of time.

    I have one lone cucumber which has made a bit of progress after last week’s hot streak. Time will tell what it does. We’ll get a small batch of peas from the garden. The peas on the side of the house are wrapping up.

    And lastly for the garden section, I’ll be excited if I see one bean! The black beans germinated the best, but also seem fairly stunted. They’re coming out of their initial slug eaten state, but are quite slow.

    It’s all a learning process!!

    Sorry, not lastly, one more garden section – the Mashua Tubers and the Delicata Squash on the side of the house are coming along. The squash seems to be in the same state as some of the other garden. I wonder if it is going to have enough time to do anything before summer is over. Time will tell.

    These items are on the end of the row of raspberries, but all of that area has lots of daisies all along the walk. And I planted a hosta at the end near the bamboo that a neighbor was going to throw out. It has done REALLY well! The hostas are about ready to bloom!

    For this update, I decided to add a few pictures of the flowers around the yard. We have quite a variety that are all meant to help provide plenty of food for hummingbirds and bees.

    We have some hydrangea and lavender next to each other and the purples are beautiful.

    There are also a couple of roses blooming and the Lucifers are starting to bloom. (The hummingbirds LOVE the Lucifers.)

    Last piece of the yard/garden to share is the bunny garden. The bunnies did NOT get the message that they’re allowed to eat this stuff. Oh well, I guess if they don’t eat it, I can harvest some. It looks like the cilantro is what actually germinated.

    (Oh and at our house, the bunnies go by the name Henry. The hummingbirds are Philip and the bat (when she’s around which she hasn’t come back this year) is Genevieve.)

    The harvest from the backyard so far this year is up to 23.2 pounds!

  • Tea Towels

    (This post contains affiliate links which means if you purchase something through this link, I’ll make a few cents)

    I started a new hobby this past winter and have continued as I wait for spring and all of the outdoor activities to begin – embroidery. Now that the outdoor activities have begun, I’ve set this aside for now, but am enjoying using these tea towels.

    Embroidery is a quick, easy thing to occupy my hands in the evenings while watching TV. 

    When I was younger, I did counted cross-stitch and because of having that experience, it helped make embroidery much easier to pick up.

    I picked up some embroidery books from the library for ideas, have hand drawn a couple of the patterns and use quilt patterns (something like these) to draw on the towels. 

    Here’s how I did it:
    1) Start with a laundered cotton or linen towel.

    2) Using a washable pen or pencil (I have a couple specific for quilting and used those), draw a pattern onto the towel. If you’re using a pattern from a book, you’ll have to place the pattern under the towel and then trace it thru the fabric. (If you can tape it up to a window or have a light box, that would make things a LOT easier). If you’re using a quilting pattern, set it on top of the towel and draw the pattern on the fabric. 

    3) Start stitching.

    For the books I got from the library, I took a picture of the instructions page so I could reference back to it after I’d returned the book. That also worked great in taking some embroidery on vacation and packing just needles, thread, small scissors, hoop and towel. 

    Here are a few of the towels I’ve finished: 

    Butterfly, dandelion and dragonfly
    Apples
    Fall leaves and pumpkin

    I have a few ideas for future towels, but I also need to have somewhere to use them 😉

    Happy crafting!

  • Strawberries

    (This post contains affiliate links which means if you purchase from my link, I will make a few cents)

    It’s strawberry season here in the PNW. I’m very thankful for a u-pick farm nearby that has a variety of things I can pick. While they aren’t certified organic, they practice clean farming practices which we appreciate. 

    I picked about 8ish pounds and brought them home, cleaned them up, sorted them and got to thinking about all that I going to do with them. 

    First up, EAT them! Strawberries are do delicious. Growing up, I wouldn’t touch them! I’m so glad my tastebuds changed in adulthood, and I tried them again. 

    I sorted the berries and separated the ones that are the ripest. (Some are almost purple, they’re so dark red!!) We’ll eat those tonight or tomorrow morning and whatever is left of those will go into jam. 

    Next up, make jam! 😛 I use Pomona Pectin which is a no-sugar/low-sugar pectin and uses calcium to activate the pectin rather than sugar. I tend to use a bit of honey for just a hint of sweetness (½ cup for the whole batch of jam). 

    I love this set of canning tools (see picture below) which helps when it comes to not burning fingers on boiling hot items!! You’ll also need canning jars. You can buy brand new with lids & rings. Or you can buy the jars, rings and lids all separate.

    Every time I can, I LOVE that ping of the jar sealing when it comes out of the water bath. I took a video and you can hear the ping, but it’s more of a ‘pong’ because the phone must have been a bit too close. LOL

    Third way to use them, freeze dry them. As I’ve previously posted, we have a Harvest Right freeze-dryer which I use to make shelf-stable, dried foods that are ultra-lightweight for backpacking. Freeze dried strawberries are delicious. They work great to break up and throw into oatmeal but are also great to eat by themselves as a snack. I love having freeze dried fruit on hand. 

    (I store a lot of my freeze-dried food in mason jars as I’m not doing this for long-term storage. There’s less waste with not throwing out a mylar bag every time I need to repackage something to take backpacking. I love these half-gallon mason jars! I use these jar sealers that I use with our Foodsaver accessory vacuum sealer)

    Lastly, I’ll freeze some that we can use in smoothies or other things throughout the winter. (Nothing like a taste of summer in the cold of winter.) Last year, we bought a stand-up deep freeze that we keep in the garage. I have loved having fruits, vegetables and meat in the freeze to ‘shop’ from when it’s time to think about what to make for meals. I have one bag of raspberries left from last year and about a half bag of diced apples from last season. 

    As it is still early in strawberry season, I’m sure I’ll go out to the u-pick farm at least once more. (The farm has about 7 varieties of strawberries and only the first two were ripe when I went today.) 

    Happy Strawberry season!